Previously posted by Em Komiskey on stlmqg.blogpost.com

Welcome to Month Seven of the St. Louis Modern Quilt Guild 2022 Block of the Month Sampler!
Remember to post your block to Instagram with the hashtag #stlmqgbom before the August meeting to be entered to win this month's prize. If you don't use Instagram, you may email a photo to the guild email.
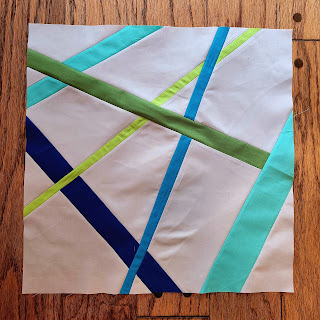
This month, we will be making an 18-inch "cut and insert" improvisational block. After the particular technique and seam matching that was required for last month's lone star block, this is a completely different vibe.
This is improv! Do *not* overthink the construction of this block. Relax ... just cut and sew!
CUTTING DIRECTIONS:
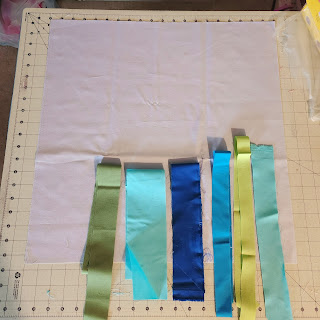
Background: 20-inch square**
Several strips of different fabrics, different widths between about 1 inch and 2½ inches, and long enough to stretch across all or part of your background square. The number of strips doesn't really matter and is up to your personal preference. Maybe you only want to use 2, maybe you want 10.
**note: if you are using a scrappy background and don't have a large enough cut to get a 20-inch square (for example: you're using fat quarters), you can construct this block by joining four (4) 9½ inch, unfinished improv squares. You'll use the same sewing directions as below, but repeat for 4 smaller blocks.
SEWING DIRECTIONS:

Place your first strip across your background square. Using a ruler lined up with the strip, cut a straight line through the background. Flip the strip right sides together with the background and sew. Sew the rest of the background to the other side of the strip.
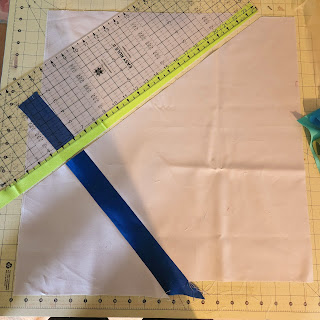
Place your second strip across your background square. Maybe it crosses your first strip; maybe it goes across your background in a spot that doesn't touch your first strip. Don't overthink it! Just cut and sew!


Continue placing your strips across your background fabric, then cutting and sewing them into your block in a way that pleases you. Maybe you're finishes after 3 or 4 strips. Maybe you're not ...


**Completely optional note about lining up your strips if you want them to have a more continuous look across the background: Okay, so this is really improv-adjacent because you're going to do a little more planning rather than just cut and sew. You can just go ahead and skip this and continue with cut and sew and embrace how the strips end up when you're finished.
No? You're still reading? Really, you can skip this part and just continue to cut and sew.
Fine. You want your strips to line up across the background. If the width of your cut strip is wider than 1-inch, and you cut so that it crosses more than one previous strip, it's impossible for the strips you bisected to line up unless you trim where you cut across the block for your insert. You will trim an amount that is equal to the width of the strip you are inserting minus 1-inch.
For example: If the strip you're inserting is 2¼ inches, you will trim off 1¼ inches from where you cut across the block to insert the strip. Sew the strip onto one side. To line up the other side, flip the remaining background (with your bisected strips) so it's right sides together with your current strip. Line up the raw edges, then fold the background back to where the ¼" seam allowance will be and slide the background along the strip you're inserting until the bisected strips line up.
I hope you skipped this part. It's confusing and it makes this easy block more complicated!

Look! I did all that so I could show you how and my bisected strips still didn't line up exactly. I probably rushed it. Guess what? That's okay! This is improv!!
Trim your block to 18½ inches! You're done!